Welcome to the Apothecary

To go to my website click the link: apothecarygreens.weebly.com

NOTE: The information in this blog does not constitute the practice of medicine, and does not replace the advice of your health care provider.

Thursday 14 August 2014

DIY: cold oil herbal infusions

Preparing your own oil infusions to use in home made balms and creams will save you money, and the added bonus is you know what you are putting in them!

This method will take some time from start to when you can use it, but it is the method I prefer unless I am in a hurry!

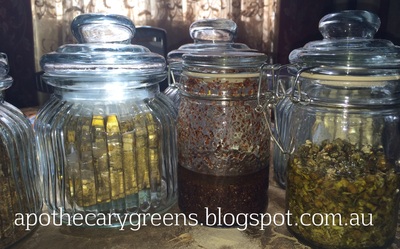
Chop up your chosen herbs (they need to be dried) *
pack them into a sterilised clear jar
cover with carrier oil (virgin olive oil is cheap and works well)
seal jar tightly and shake lightly
place in a warm sunny spot (window seals are ideal)
every day give the jar a shake
leave them in this spot for 2-3 weeks at least
Then strain the infused oil into a dark glass bottle
if stored in a cool dark place it will last for up to a year
LABEL IT!


* The reason I suggest that the herbs used to create an infusion are dried is that any moisture added into the infusion via fresh (damp) vegetation can introduce moulds or bacteria into the infusion. For safety reasons i prefer to use dried herbs.

.........................................................................................................................
 NOTE: The information in this blog does not constitute the practice of medicine, and does not replace the advice of your health care provider.

DIY: Bruise Balm

Bruise balm - set in the containers 
I don't know about you, but I am really clumsy, if there is something to trip over or fall on, I am there! This means I bruise, sprain, and injure myself quite frequently.

I prefer to make my own remedies wherever possible, especially for minor injuries or illnesses. (of course i see a Medical Professional/Doctor when the injury or illness is serious - I take a balanced view in healing and know when to bring in the big guns..)

I have an ointment i use in my herbal first aid kit, (there are many ointment recipes that are of use to treat bruises and sprains, this is just one of them), that I created a while back and I find it really effective to help alleviate pain and swelling on minor sprains, strains and bruises.

DO keep it away from open wounds and your eyes, this stuff contains ginger and cayenne and will STING!

I wanted to share it with you, (I published this recipe originally  my website: apothecarygreens.weebly.com)


Bruise balm - just poured into containers and cooling


This balm must not be used on broken skin (as it may sting!) Useful for bringing out and soothing bruises, sprains and external muscle and joint inflammation. Be cautious if you have any allergies to any of the ingredients.  Please seek the assistance of a health care professional  when needed.

INGREDIENTS
100 ml oil infused arnica flowers
50 ml oil infused chamomile flowers
50 ml oil infused ground ginger root
50 ml oil infused dried cayenne
beeswax
1 vitamin E capsule
containers
labels
saucepan
measuring jug/scales

METHOD

  • with a saucepan on a LOW heat add the infused oils (to make 250 ml of combined oil)
  • add 25 grams of beeswax
  • melt the beeswax stirring it through
  • turn the heat off and add the contents of the Vitamin E capsule, stir through
  • then pour the mixture into sterilised containers
  • leave to cool before you put the lids on!
  • label the containers with what it is what it is used for, when it was made, any cautions it needs, (e.g. do not use near eyes or open wounds), the best before date and the creation date.
  • The vitamin E will preserve the ointment so it will last up to twelve months if stored in a cool dark place
USES
apply to bruises, sprains, sore backs as needed.
be careful not to apply on or near open wounds and keep away form your eyes! (cayenne stings!)

HOW IT WORKS

  • Arnica: helps to reduce swelling, brings bruises up to the surface to encourage healing
  • Chamomile: helps to reduce inflammation and is calming to the skin
  • Ginger: warming, pain relief, encourages blood flow to the injury to promote healing
  • Cayenne: warming, pain relief, and encourages blood flow to promote healing

.........................................................................................................................
 NOTE: The information in this blog does not constitute the practice of medicine, and does not replace the advice of your health care provider.

Friday 8 August 2014

DIY: ointments

Some of the information on how to create a basic ointment was originally posted on my website.

Ointments are a good way to apply herbal remedies topically, they can be carried around in small pots and applied as needed. Unlike creams that are made with a mix of water and oil, ointments are made with oils and wax/animal fats/petroleum jelly.  Ointments are also known as salves or balms, and are not just the province of Herbalists. Arnica balm for example can be purchased from pharmacies to apply to bruised skin to help relieve and bring out bruises.

Making ointments is easy, here is a basic recipe.

What you need

  • 250 ml carrier oil 
  • herbs of choice (chopped fresh or dry herbs)
  • 25 grams beeswax
  • sterilised containers
  • saucepan
  • funnel
  • labels

Method

  • in a saucepan on a low heat, add the carrier oil and herbs
  • heat very slowly, simmering at a low heat for about two hours
  • strain the herb infused oil through muslin cloth and put the oil back in the saucepan
  • still on a low heat add the chopped up beeswax
  • allow to melt, stir through
  • then pour into dark glass jars
  • allow to cool then put the lids on
  • label the jars with date made, ingredients, what it is used for, and the use by date
  • Ointments made this way will keep for about four to six months if stored in a cool dark place.
NOTE: if you add some Vitamin E oil to this mixture you can increase the shelf life to up to a year.
old ointment jar (origin of photo unknown)


.........................................................................................................................
 NOTE: The information in this blog does not constitute the practice of medicine, and does not replace the advice of your health care provider.

Saturday 2 August 2014

Spotlight on Herbs: Angelica

Angelica Archangelica looks a bit like celery; it is a perennial that grows to around 2 metres high. If you prevent it from flowering the plant will live longer, so nip off those flowers to keep the plant alive!


Angelica Archangelica
All parts of Angelica archangelica are edible, but make sure you have identified the plant correctly, as it resembles Hemlock which is poisonous!!

Traditionally the stalks are candied for use in cake decorations, and leaves which are sweet can be added to fruit dishes, or even some savoury foods to add a sweet contrast.

Medicinally, a tea made from the leaves and ground dry root can be taken to help soothe nervous conditions, and the stems when chewed may relieve stomach gas and bloating.

Angelica when made into a salve, liniment or ointment can be applied to the skin to assist in relieving nerve pain (Neuralgia) and joint pain (such as Rheumatism).


CAUTION: Due to the sugar content Angelica should not be given to people who have Diabetes.

As Angelica is an emmanagogue it should be avoided when pregant

Due to the presence of furanocoumarins prolonged use of Angelica may cause skin photosensitivity or Dermatitis


.........................................................................................................................
 NOTE: The information in this blog does not constitute the practice of medicine, and does not replace the advice of your health care provider.